.jpg)
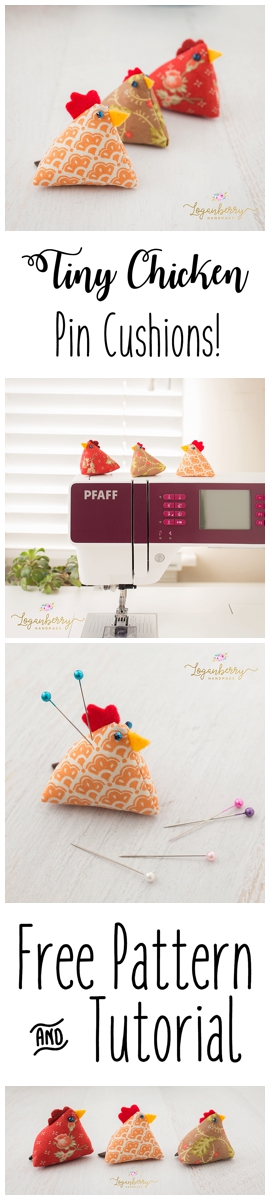
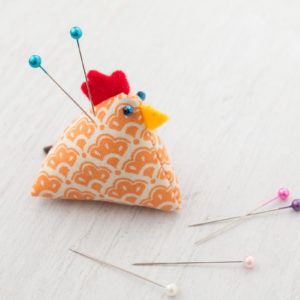
![]() Are these little chicken pin cushions the cutest ever, or what! Not only are they easy to make but also very addicting! I wanted to make an entire coop full! These little guys stand only 1.75″ tall and here’s the tutorial on how to make them!
Are these little chicken pin cushions the cutest ever, or what! Not only are they easy to make but also very addicting! I wanted to make an entire coop full! These little guys stand only 1.75″ tall and here’s the tutorial on how to make them!
.jpg)
![]()
.jpg)
![]()
Materials:
- Two 2.5″ fabric squares (a variety of beautiful prints are available at my favorite fabric shop, Fat Quarter Shop!)
- Felt fabric in red, yellow, and brown to cut out shapes for the chicken comb, beak, and tail. Here’s a link to a great assortment of colors available online so you can always have them handy! Felt fabric value pack, assorted colors.
- Two small beads for the eyes. I prefer the tiny glass beads, which also comes in a variety of colors.
- Rice grains to fill the chicken body
- Needle and thread
.jpg)
![]()
Place the comb and beak onto the first fabric square (as pictured above). Then place the second fabric square on top (right sides together) and sew across the top and down the right side. Make sure the comb and beak are secure.
.jpg)
![]()
Flip the sewn fabric right sides out and sew on the eyes (one on each side).
.jpg)
![]()
Flip the fabric squares back and sew small stitches along the bottom to secure the corners, but leaving a gap in the middle. This will be the opening used to flip the chicken back.
.jpg)
![]()
On the side that is completely unsewn (left side), flip it open so the edges meet and it turns into a pyramid. Insert the tail, secure, and sew completely shut. Then flip back to the right side.
.jpg)
![]()
Fatten this little guy up with the rice grains, then sew him shut. I used a simple whipstitch. The stitches are visible, but it’s ok, it’s on the bottom part anyway. I guess you can blind stitch it, if you really want to hide the stitches. But I like my hand stitching to show. It’s definitely not perfect but I think the imperfections make it special. :)
.jpg)
![]()
.jpg)
![]()
Little chicken tushie. Yes, I said tushie. It’s a funny word!
.jpg)
![]()
.jpg)
![]()
So there you have it, folks! Tiny chicken pin cushions! I hope you enjoyed this tutorial and keep coming back for more! Let me know how yours turn out!
Lots of love, Susie 😊✨
![]()
Have you tried this tutorial? Let me know what you think!

.jpg)
Deb - These chicken pin cushions are so cute. I can’t wait to make some. Thank you!November 21, 2021 – 5:24 pm
Kay - Thank you of the tutorial. They are very sweet. I have lots of pincushions and now will probably make myself some more too. xMay 9, 2018 – 12:25 am
Susie - Hi Kay! So happy you enjoyed the tutorial! Happy sewing!! 🤗✨May 9, 2018 – 11:09 am