.jpg)
![]() Happy Mother’s Day to all the lovely moms out there! You are strong, beautiful, and AMAZING! This is our day! Let’s make it SPECTACULAR!! 🤗💐✨
Happy Mother’s Day to all the lovely moms out there! You are strong, beautiful, and AMAZING! This is our day! Let’s make it SPECTACULAR!! 🤗💐✨
.jpg)
![]() And also…. SMILE! 🙃💓
And also…. SMILE! 🙃💓
To see the full post for these lovely little Potpourri Pillows, click here!
![]() Happy Mother’s Day to all the lovely moms out there! You are strong, beautiful, and AMAZING! This is our day! Let’s make it SPECTACULAR!! 🤗💐✨
Happy Mother’s Day to all the lovely moms out there! You are strong, beautiful, and AMAZING! This is our day! Let’s make it SPECTACULAR!! 🤗💐✨
![]() And also…. SMILE! 🙃💓
And also…. SMILE! 🙃💓
To see the full post for these lovely little Potpourri Pillows, click here!
![]()
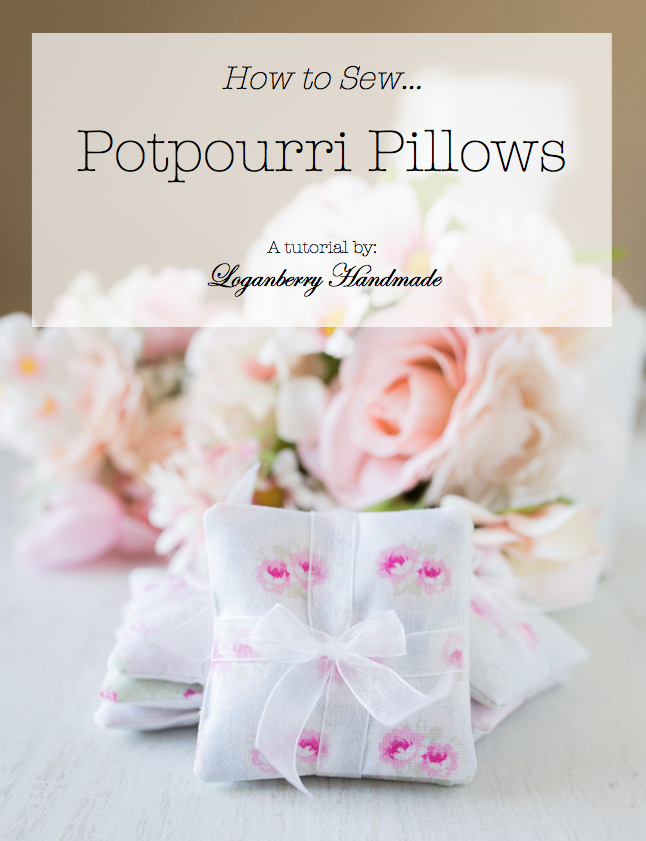
Here’s a very quick project you can sew up in a matter of minutes! It’s a cute little pillow filled with potpourri! With Mother’s Day just around the corner, I know mom always appreciates a handmade gift, made with love. 💝 You can make these any size you want. I opted to make mine tiny (3″ pillows) so mom can put them in her purse, drawers, or wherever she likes, really. I just think they’re way cuter when they are tiny.

![]() I made several of them and packaged them up in pretty ribbon. I even clipped a gift tag with a mini wooden clothespin… because it makes me smile!
I made several of them and packaged them up in pretty ribbon. I even clipped a gift tag with a mini wooden clothespin… because it makes me smile!
![]()
Materials Needed:
![]() Take two fabric squares and place them right sides together. Using 1/4″ seam allowance, sew them together. BE SURE to leave a 1″ gap on one of the sides. You’ll be turning them right side out AFTER you clip the corners. ✂ It helps keeps your corners nice and not too bulky.
Take two fabric squares and place them right sides together. Using 1/4″ seam allowance, sew them together. BE SURE to leave a 1″ gap on one of the sides. You’ll be turning them right side out AFTER you clip the corners. ✂ It helps keeps your corners nice and not too bulky.
![]() Turn your little square right side out through the gap. Now it’s a pouch! ☺
Turn your little square right side out through the gap. Now it’s a pouch! ☺
![]() Fill your little pouch with some potpourri. The hole is small so it is helpful to use a piece of paper to create a funnel.
Fill your little pouch with some potpourri. The hole is small so it is helpful to use a piece of paper to create a funnel.
![]() Sew the opening closed. Now it’s a potpourri pillow! ☺✨
Sew the opening closed. Now it’s a potpourri pillow! ☺✨
![]()
![]()
They’re pretty cute when you tie a few of them together. The perfect mini gift!
I made quite a few of them. It takes just a few minutes to sew one, and it smells SO GOOD! It does get addicting!
![]()
![]()
![]()
![]()
Have you made these Potpourri Pillows? Let me know what you think!
Beautiful! Thanks.June 26, 2018 – 3:03 pm
These are lovely. A few years ago I made lots of these as Christmas presents and gave them in sets of three tied with ribbon. xMay 9, 2018 – 11:50 pm
Hi Kay! What a great idea! These are so easy to make that I probably will end up making some for Christmas too! 🤗✨May 11, 2018 – 3:57 am
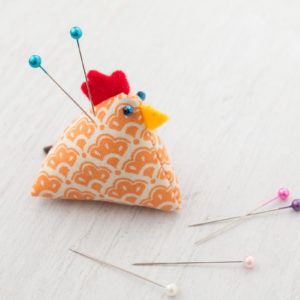
![]() Are these little chicken pin cushions the cutest ever, or what! Not only are they easy to make but also very addicting! I wanted to make an entire coop full! These little guys stand only 1.75″ tall and here’s the tutorial on how to make them!
Are these little chicken pin cushions the cutest ever, or what! Not only are they easy to make but also very addicting! I wanted to make an entire coop full! These little guys stand only 1.75″ tall and here’s the tutorial on how to make them!
![]()
![]()
![]()
Place the comb and beak onto the first fabric square (as pictured above). Then place the second fabric square on top (right sides together) and sew across the top and down the right side. Make sure the comb and beak are secure.
![]()
Flip the sewn fabric right sides out and sew on the eyes (one on each side).
![]()
Flip the fabric squares back and sew small stitches along the bottom to secure the corners, but leaving a gap in the middle. This will be the opening used to flip the chicken back.
![]()
On the side that is completely unsewn (left side), flip it open so the edges meet and it turns into a pyramid. Insert the tail, secure, and sew completely shut. Then flip back to the right side.
![]()
Fatten this little guy up with the rice grains, then sew him shut. I used a simple whipstitch. The stitches are visible, but it’s ok, it’s on the bottom part anyway. I guess you can blind stitch it, if you really want to hide the stitches. But I like my hand stitching to show. It’s definitely not perfect but I think the imperfections make it special. :)
![]()
![]()
Little chicken tushie. Yes, I said tushie. It’s a funny word!
![]()
![]()
So there you have it, folks! Tiny chicken pin cushions! I hope you enjoyed this tutorial and keep coming back for more! Let me know how yours turn out!
Lots of love, Susie 😊✨
![]()
Have you tried this tutorial? Let me know what you think!
These chicken pin cushions are so cute. I can’t wait to make some. Thank you!November 21, 2021 – 5:24 pm
Thank you of the tutorial. They are very sweet. I have lots of pincushions and now will probably make myself some more too. xMay 9, 2018 – 12:25 am
Hi Kay! So happy you enjoyed the tutorial! Happy sewing!! 🤗✨May 9, 2018 – 11:09 am
![]()
![]()
A couple weeks ago, I made an adorable minky baby blanket for my niece Kayla. I made another one for a friend’s baby and figured I can take pictures along the way so I can write a full tutorial for you! All you need is one yard of two kinds of fabrics and it comes together fast! You can probably sew one in under 30 minutes! So here it is… are you ready?
![]()
![]()
![]()
![]()
Place the cotton fabric on top of the minky fabric, right sides together. Trim each sides to make sure they line up and the corners are square. Next, pin all the way around to secure.
![]()
![]()
In the middle of one side, remove the pins to leave a 6″ gap where you will NOT be sewing (for now). This gap will be used to invert the fabric right sides out later on. Sew all around (except the gap), using 1/2″ seam allowance.
![]()
![]()
Where the gap is located, make sure you backstitch to secure it. Otherwise, when it comes time to invert the blanket, the seams rip apart as you’re opening it. (I live and learn…🙈)
![]()
![]()
Once you’re done sewing, clip all the corners to eliminate bulk in the corners. Next, invert the entire blanket through the gap, right sides out.
![]()
![]()
Steam press all around the blanket to get a nice pressed seam.
Now, topstitch 1/4″ seam allowance all around! I chose to topstitch twice because it’s extra secure and I like the way it looks. 😊
![]()
![]()
![]()
![]()
![]()
![]()
That’s it! Tell me that was super easy! And fast too, right? I was able to finish this blanket in under 30 minutes!
Hope your new year is off to a great start everyone! -Susie 😊✨
![]()
Have you tried this tutorial? Let me know what you think!
Hi, I have just made mine this morning and I’m really proud of it. I will have to work on straight line seams though ! Thank you for the help !March 1, 2021 – 5:36 am
any pro tips for working with minky fabric because it’s so shifty? Changing tension or weights? dry vs wet?February 27, 2021 – 11:42 am
I’m very new to sewing so this may seem like a silly question. Does the fabric in the middle separate? Can it be pulled apart and you can tell the middle of the blanket is hollow? I know the edges are sewn together so I was just curious about the middle.December 2, 2020 – 7:49 am
Thank you!! So cute – can’t wait to make one!! Just ordered 5 different color minkies!!September 28, 2020 – 7:35 am
How exciting! Hope you’ll share pics of the blankets when you’re done! Happy to hear you like the tutorial!September 28, 2020 – 9:15 am
Just wondering if you have tried this baby blanket with flannel instead of cotton?November 9, 2019 – 2:44 pm
Hi Sherri,
I have not tried it with flannel but I am sure the blanket would be just as cute and cozy! Let me know how your blanket turns out! 😊November 11, 2019 – 1:55 pm
Back in my day we made them from flannel . We bought 2 yds . Folded in half wrong side out ,sewed around leaving small opening to turn . Turn press edges , top stitch edgesSeptember 28, 2021 – 12:32 pm

.jpg)