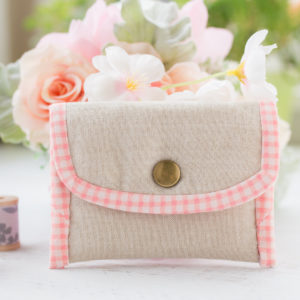
This weekend I made this cute little card wallet.  My current wallet is falling apart so a new one was in order!  I chose some a nice linen and paired with this pink gingham binding – Oh my goodness!  Such a sweet combo!  I finished the wallet with a little antique brass snap button.

Mini Card Wallet + Sewing Tutorial + Free Pattern, linen wallet, small wallet, easy sewing projects, gingham binding, how to sew a wallet, small hand bag, pouch, coin purse, coin bag

I made a tutorial for this so you can make one too.  It’s super simple and comes together really quickly.  Enjoy!

Materials

Mini Card Wallet + Sewing Tutorial + Free Pattern, linen wallet, small wallet, easy sewing projects, gingham binding, how to sew a wallet, small hand bag, pouch, coin purse, coin bag

Place outer fabric and lining fabric, right sides together, and sew 1/4″ seam allowance.  Steam press to crease.

Mini Card Wallet + Sewing Tutorial + Free Pattern, linen wallet, small wallet, easy sewing projects, gingham binding, how to sew a wallet, small hand bag, pouch, coin purse, coin bag

Fold the fabric piece, right sides facing outwards, and place the batting piece in between the two fabrics.

Mini Card Wallet + Sewing Tutorial + Free Pattern, linen wallet, small wallet, easy sewing projects, gingham binding, how to sew a wallet, small hand bag, pouch, coin purse, coin bag

With the end that was just sewn, fold up 2.75″.  The fabrics will shift as you fold up and that’s good.  Letting it slide up will keep it smooth and flat.  If you don’t let it slide up, it will bunch up.  Secure with your pins.

Mini Card Wallet + Sewing Tutorial + Free Pattern, linen wallet, small wallet, easy sewing projects, gingham binding, how to sew a wallet, small hand bag, pouch, coin purse, coin bag

Sew along both sides with 1/8″ seam allowance to secure.  Trim off some excess batting to straighten the edges.  It doesn’t have to be perfect though.  The binding will cover all the edges anyway.  😉

Mini Card Wallet + Sewing Tutorial + Free Pattern, linen wallet, small wallet, easy sewing projects, gingham binding, how to sew a wallet, small hand bag, pouch, coin purse, coin bag

Use a round object to draw the curve along the top.  I used an 8″ plate.

Mini Card Wallet + Sewing Tutorial + Free Pattern, linen wallet, small wallet, easy sewing projects, gingham binding, how to sew a wallet, small hand bag, pouch, coin purse, coin bag

Sew along the curve using 1/8″ seam allowance.  Then, trim the excess fabric off.

Mini Card Wallet + Sewing Tutorial + Free Pattern, linen wallet, small wallet, easy sewing projects, gingham binding, how to sew a wallet, small hand bag, pouch, coin purse, coin bag

Next, take your fabric bias tape and sew along the back.  Be sure to fold in the ends for a smoother finish.  If you need to know how to cut bias tape, I have a tutorial for that!  See it here: How to Cut & Sew Bias Binding.

Mini Card Wallet + Sewing Tutorial + Free Pattern, linen wallet, small wallet, easy sewing projects, gingham binding, how to sew a wallet, small hand bag, pouch, coin purse, coin bag

Bring the binding to the front and fold under.  Clip all around to prepare for sewing.  Although you can sew on by machine, I don’t like the stitches showing in the back so I opted to hand-stitch it.

Mini Card Wallet + Sewing Tutorial + Free Pattern, linen wallet, small wallet, easy sewing projects, gingham binding, how to sew a wallet, small hand bag, pouch, coin purse, coin bag

Now, just install your snap button and you’re done!  Yay! 🤗✨  (If you’re unfamiliar with the process of installing a snap button, I have a tutorial for this here:  How to Install Snap Buttons!)

Mini Card Wallet + Sewing Tutorial + Free Pattern, linen wallet, small wallet, easy sewing projects, gingham binding, how to sew a wallet, small hand bag, pouch, coin purse, coin bagI made several even though I only needed one.  It’s just for fun… and make for pretty pictures. 😊

Mini Card Wallet + Sewing Tutorial + Free Pattern, linen wallet, small wallet, easy sewing projects, gingham binding, how to sew a wallet, small hand bag, pouch, coin purse, coin bag

Do you like the little polka dot fabric?  It’s too cute!

Mini Card Wallet + Sewing Tutorial + Free Pattern, linen wallet, small wallet, easy sewing projects, gingham binding, how to sew a wallet, small hand bag, pouch, coin purse, coin bagMini Card Wallet + Sewing Tutorial + Free Pattern, linen wallet, small wallet, easy sewing projects, gingham binding, how to sew a wallet, small hand bag, pouch, coin purse, coin bag

I made one with a matching fabric bag so I can gift it to my sister-in-law.  You can make the matching bag too.  Here’s the tutorial:  5-minute Fabric Gift Bags Sewing Tutorial

Mini Card Wallet + Sewing Tutorial + Free Pattern, linen wallet, small wallet, easy sewing projects, gingham binding, how to sew a wallet, small hand bag, pouch, coin purse, coin bag

I hope you enjoyed my tutorial for this cute little card wallet!  Check back often for more!

Make it a beautiful day, everyone!  -Susie 🤓💓

Mini Card Wallet + Sewing Tutorial + Free Pattern, linen wallet, small wallet, easy sewing projects, gingham binding, how to sew a wallet, small hand bag, pouch, coin purse, coin bag

Have you tried this tutorial?  Let me know what you think!

  • Bloom - This is a really cute pattern. Thank you very much!November 15, 2021 – 10:53 amReplyCancel

5-Minute Fabric Gift Bag + Tutorial + Free Pattern, diy gift bags, sewing drawstring bag, fabric bags, small pouch, coin pouch, bag and ribbon, sewing gifts, quick sewing projects, sewing for beginners, fat quarter bags

I actually timed myself when I made these little bags.  Of the six bags I had made, 4 minutes and 39 seconds was my fastest time for making one bag!  Pretty quick, right?  But we’ll round up a little and call them the “5-Minute Gift Bag” because the name sounds more catchy than the “4-Minute Gift Bag.”  😊

I’ve decided that from now on, perhaps I won’t be buying anymore paper bags to put my gifts in.  These fabric bags are way cuter AND has much more personal touch!  Friends will receive gifts in handmade fabric bags from now on.  😉💝

Would you like to make one too?  Well, if you’ve got 5 minutes, you can make yourself a little fabric bag!

5-Minute Fabric Gift Bag + Tutorial + Free Pattern, diy gift bags, sewing drawstring bag, fabric bags, small pouch, coin pouch, bag and ribbon, sewing gifts, quick sewing projects, sewing for beginners, fat quarter bags

I made them in two sizes and I’m including both measurements for you to choose from.  For sense of scale, the smaller size would fit a gift card nicely.

Materials

  • 1 Fabric piece (a variety of beautiful prints are available at my favorite fabric shop, Fat Quarter Shop!)
    • 7″ x 8″ for small size bag
    • 8″ x 10″ for bigger size bag
  • 3/8″ Satin Ribbon  (Amazon has a nice variety pack of 10 colors.  I always like to buy an assortment so I have many colors to choose from, depending on what project I’m working on at the time.)
  • Safety pin

5-Minute Fabric Gift Bag + Tutorial + Free Pattern, diy gift bags, sewing drawstring bag, fabric bags, small pouch, coin pouch, bag and ribbon, sewing gifts, quick sewing projects, sewing for beginners, fat quarter bags5-Minute Fabric Gift Bag + Tutorial + Free Pattern, diy gift bags, sewing drawstring bag, fabric bags, small pouch, coin pouch, bag and ribbon, sewing gifts, quick sewing projects, sewing for beginners, fat quarter bags

Start with the fabric piece wrong side facing up, fold the top down 1″ lengthwise and steam press to crease.  Then, sew 1/2″ seam allowance to secure.

5-Minute Fabric Gift Bag + Tutorial + Free Pattern, diy gift bags, sewing drawstring bag, fabric bags, small pouch, coin pouch, bag and ribbon, sewing gifts, quick sewing projects, sewing for beginners, fat quarter bags

Next, fold in half, right sides together.  Starting at the seam line, sew 1/4″ seam allowance down the right edge, then along the bottom.  (Make sure you DON’T start sewing at the very top.  You need the opening at the top for the ribbon.)  Then, invert the little bag right sides out.

5-Minute Fabric Gift Bag + Tutorial + Free Pattern, diy gift bags, sewing drawstring bag, fabric bags, small pouch, coin pouch, bag and ribbon, sewing gifts, quick sewing projects, sewing for beginners, fat quarter bags

Take the safety pin and attach it to the end of the ribbon.  Use the safety pin to run the ribbon through the top opening of the bag and pull out the other side.

5-Minute Fabric Gift Bag + Tutorial + Free Pattern, diy gift bags, sewing drawstring bag, fabric bags, small pouch, coin pouch, bag and ribbon, sewing gifts, quick sewing projects, sewing for beginners, fat quarter bags

Remove the safety pin, stuff the gift bag, and finish off with a pretty bow!  You’re done!

5-Minute Fabric Gift Bag + Tutorial + Free Pattern, diy gift bags, sewing drawstring bag, fabric bags, small pouch, coin pouch, bag and ribbon, sewing gifts, quick sewing projects, sewing for beginners, fat quarter bags5-Minute Fabric Gift Bag + Tutorial + Free Pattern, diy gift bags, sewing drawstring bag, fabric bags, small pouch, coin pouch, bag and ribbon, sewing gifts, quick sewing projects, sewing for beginners, fat quarter bags5-Minute Fabric Gift Bag + Tutorial + Free Pattern, diy gift bags, sewing drawstring bag, fabric bags, small pouch, coin pouch, bag and ribbon, sewing gifts, quick sewing projects, sewing for beginners, fat quarter bags5-Minute Fabric Gift Bag + Tutorial + Free Pattern, diy gift bags, sewing drawstring bag, fabric bags, small pouch, coin pouch, bag and ribbon, sewing gifts, quick sewing projects, sewing for beginners, fat quarter bags5-Minute Fabric Gift Bag + Tutorial + Free Pattern, diy gift bags, sewing drawstring bag, fabric bags, small pouch, coin pouch, bag and ribbon, sewing gifts, quick sewing projects, sewing for beginners, fat quarter bags

So… did you time yourself?  Did it take you only 5 minutes?  I hope you enjoyed this tutorial.  I hope to bring you more quick projects, just like this one!

Make it a beautiful day, everyone!  -Susie 🤓💓

5-Minute Fabric Gift Bag + Tutorial + Free Pattern, diy gift bags, sewing drawstring bag, fabric bags, small pouch, coin pouch, bag and ribbon, sewing gifts, quick sewing projects, sewing for beginners, fat quarter bags

Have you tried this tutorial?  Let me know what you think!

  • Becky - Thank you so much for such a simple tutorial! This is exactly what I was looking for (to make bags to contain kids puzzles) and I appreciate how understandable you’ve made this!August 24, 2021 – 8:18 amReplyCancel

  • Beth - Thanks! Looking all over for a simple bag. I just can’t figure out myself but your instructions are great.. even without a video!!

    BethApril 21, 2021 – 4:37 amReplyCancel

  • Monika - Cute. I love the fabrics. And the bags too!!!February 9, 2021 – 9:24 amReplyCancel

linen patchwork coasters sewing tutorial, patchwork coasters sewing pattern, how to sew coasters, quick and easy things to sew, easy sewing projects, sewing for beginners, miss kate fabric, zakka sewing projects, sewing for the home, handmade coasters, sewing gifts, gifts to sew

This week, I did some last minute, secret sewing of Christmas gifts! Here’s one of my favorites – patchwork coasters made with linen and cotton fabrics!  I’ve made these cute little coasters for my sweet sister-in-law.  She uses coasters for her coffee table, and over the weeks, I’ve noticed that she’s missing a couple coasters from her set.  So I’ve made her a new set!

linen patchwork coasters sewing tutorial, patchwork coasters sewing pattern, how to sew coasters, quick and easy things to sew, easy sewing projects, sewing for beginners, miss kate fabric, zakka sewing projects, sewing for the home, handmade coasters, sewing gifts, gifts to sew

The fabrics used in the patchwork is from a Bonnie and Camille collection called Miss Kate.  It was the first designer fabric I bought, actually.  I had some left over from my stars quilt, and what better way to use scraps than in some patchwork projects!

I’ve written up a tutorial for these cute patchwork coasters so you can make some too… if you’d like  :)

linen patchwork coasters sewing tutorial, patchwork coasters sewing pattern, how to sew coasters, quick and easy things to sew, easy sewing projects, sewing for beginners, miss kate fabric, zakka sewing projects, sewing for the home, handmade coasters, sewing gifts, gifts to sew

Fabrics and Materials

Linen Fabrics – Amazon offers a nice fat quarter bundle by Elizabeth Hartman.  It’s a very pretty assortment of colors too!

  • 1 piece – 4.5″ x 4.5″
  • 1 piece – 4.5″ x 1.5″
  • 1 piece – 4.5″ x 2″

Cotton Patchwork Fabrics (a variety of beautiful prints are available at my favorite fabric shop, Fat Quarter Shop!)

  • 4 pieces – 2″ x 1.5″

Cotton Batting: 1 piece – 4″ x 4″

linen patchwork coasters sewing tutorial, patchwork coasters sewing pattern, how to sew coasters, quick and easy things to sew, easy sewing projects, sewing for beginners, miss kate fabric, zakka sewing projects, sewing for the home, handmade coasters, sewing gifts, gifts to sew

First, sew together the 4 small pieces of fabrics for your patchwork, then press the seams.  Next, sew on the left side linen, and then, the right side linen.  Press all seams to set.

linen patchwork coasters sewing tutorial, patchwork coasters sewing pattern, how to sew coasters, quick and easy things to sew, easy sewing projects, sewing for beginners, miss kate fabric, zakka sewing projects, sewing for the home, handmade coasters, sewing gifts, gifts to sew

Take the cotton batting piece and center it UNDER the front piece.  Topstitch along each side of the patchwork.  This will secure the batting piece to the back.

Next, take the linen square and place right sides together over the front piece and sew together, leaving a 2″ gap at the bottom.  This is where you will invert the coaster right sides out.  Be sure to CLIP ALL FOUR CORNERS before inverting so that you can get nice corners on your coaster!

linen patchwork coasters sewing tutorial, patchwork coasters sewing pattern, how to sew coasters, quick and easy things to sew, easy sewing projects, sewing for beginners, miss kate fabric, zakka sewing projects, sewing for the home, handmade coasters, sewing gifts, gifts to sew

Once you have flipped the coaster right sides out, tuck in the fabric where the gap is and press it to set all the seams.  Then, topstitch all around the coaster and you’re all done!

linen patchwork coasters sewing tutorial, patchwork coasters sewing pattern, how to sew coasters, quick and easy things to sew, easy sewing projects, sewing for beginners, miss kate fabric, zakka sewing projects, sewing for the home, handmade coasters, sewing gifts, gifts to sewlinen patchwork coasters sewing tutorial, patchwork coasters sewing pattern, how to sew coasters, quick and easy things to sew, easy sewing projects, sewing for beginners, miss kate fabric, zakka sewing projects, sewing for the home, handmade coasters, sewing gifts, gifts to sew

I hope you enjoyed this tutorial and keep coming back for more.  Let me know how your coasters turn out!

Lots of love, Susie 😊✨

Fabric Coasters Sewing + Tutorial + Free Pattern, Patchwork Coasters, Linen Coasters, Zakka Sewing Projects, Sewing for the home, DIY Sewing Small, Mini Quilt Projects

Have you tried this tutorial?  Let me know what you think!

  • Ka Bor - Hi! I loved this tutorial. It was so easy to make and a great scrap fabric buster. I enjoyed making it so much and it’s so practical too! Thank you so much! :DNovember 10, 2020 – 6:38 amReplyCancel

    • Susie Loganberry - Hi Ka Bor, thank you so much for your comment! I’m so happy you enjoyed the tutorial! Happy Sewing! :)November 10, 2020 – 8:13 pmReplyCancel

  • Anique - Now I know what I’m going to make with my leftover fabric! Thanks for this tutorial :D Your website is awesome.July 10, 2018 – 8:29 pmReplyCancel

    • Susie - Thanks Anique! Happy you visited today! :)July 11, 2018 – 11:36 amReplyCancel

pyramid pouch sewing tutorial, zipper bag free sewing pattern, how to sew a zipper bag, triangle bag sewing patternHere’s my sewing tutorial for this cute little pyramid pouch!  The finished size measures 3½”.

Basic Material Requirements: Scissors, rotary cutter, rulers, sewing thread, pins or clips, sewing machine

7-inch Zipper (one)  I make so many of these that I buy zippers in bulk, so I will always have them on hand.  (Zippers are really cheap on Amazon – 9″ Zippers, 54 pieces, assorted colors.  Just cut them down to the size you need!)

Fabrics:
4” x 8” rectangle     Outer Fabric
4” x 8” rectangle     Lining Fabric
4” x 8” rectangle     Batting
2” x 4” rectangle     Tag

See a variety of beautiful prints available at my favorite fabric shop, Fat Quarter Shop!

Notes:

 Sew all pieces using ¼” seam allowance.
 It is not necessary to use a zipper foot when attaching the zipper to the fabric, but it is helpful if you prefer the fabric to be close to the zipper teeth.

Sewing Instructions:

Attach the outer shell fabric to the the batting by quilting repeated lines 1” apart.

With outer shell facing up, place the zipper at the edge facing down. Then place the lining fabric on top, facing down. Clip together to hold in place and sew down the edge.

zipper bag sewing tutorial pyramid pouch

Flip the lining over to face down, zipper face up, and outer shell face up. Top stitch to secure all layers.

Fold the outer shell in half to meet the unsewn side of the zipper. Then fold the lining fabric in half and place face down on top of zipper.

zipper bag sewing tutorial pyramid pouch

Clip down and sew together all layers.

Topstitch along the zipper by flipping the lining around so that the outer shell is facing outward.

*Note: This part gets tricky as you get to the narrow side of the zipper! Go slow and tug on fabric as you sew to maximize space and maintain an even stitch.

Zip the pouch closed and flip inside out. Flatten the pouch so that the wrong side of the zipper is placed horizontally in the middle. Sew along the right edge using a regular sewing stitch. Then, use a zig-zag stitch to close up the raw edge.

Trim the sewn edge, as well as all loose threads.

Press the tag fabric in half lengthwise and then fold in the sides to meet the middle. Press to hold shape. Then topstitch lengthwise to secure.

zipper bag free sewing pattern

Open the opposite side of the pouch and clip closed. Fold tag in half lengthwise and insert into pouch ½“ from the zipper, pin in place. Use an additional clip to secure the edge. ***MAKE SURE the zipper is halfway open.***   Sew along the edge using a regular sewing stitch. Then, use a zig-zag stitch to close up the raw edge. (If the zipper is closed when you sew this edge, you won’t be able to get the pouch open! 😊)

I hope you enjoyed this tutorial!

See more photos of the finished pyramid pouch here!

Thanks for stopping in today!  Happy Sewing!

Susie 😊✨

Pyramid Pouch Sewing Tutorial + Free Pattern, triangle zipper bag, small zipper pouch, coin purse, easy sewing projects

Have you tried this pattern?  Let me know what you think!

  • Carol - I discovered your website tonight. I love all the ideas I am finding for gifts to make through next year – Thank You!December 23, 2020 – 7:59 pmReplyCancel